Goodbye Microsoft Teams: Running Your Own Video Conferencing with Jitsi Meet on Kubernetes
Microsoft Teams costs money. It sends your meeting data to servers you don't control. It requires accounts in a Microsoft tenant. And if the licensing changes, your video conferencing disappears overnight.
Jitsi Meet costs nothing, runs on hardware you own, keeps your data inside your network, and works with any browser — no app install required.
This is the story of how I deployed it on a bare-metal Kubernetes cluster, solved a tricky network problem with SFR 5G mobile users, and wired it up to a company-wide SSO system. By the end of this post, you'll understand how WebRTC video calls actually work, and have a clear map for deploying Jitsi yourself.
What Is Jitsi Meet?
Jitsi Meet is a fully open-source video conferencing platform. You open a browser, type a room name, and start a call. No account required for participants, no app to install, no per-seat licensing.
Under the hood it uses WebRTC — the same standard that Google Meet, Zoom's browser client, and Discord video all use. The difference is that with Jitsi, you run the servers yourself.
The platform is maintained by 8x8 (the company that acquired the Jitsi project from Atlassian), but the code is 100% open source under the Apache 2.0 license.
Why Not Just Use Teams or Zoom?
| Microsoft Teams | Zoom | Jitsi (self-hosted) | |
|---|---|---|---|
| Cost | €4–12.50/user/month | €139/year/host | Free |
| Data location | Microsoft datacenters | Zoom datacenters | Your servers |
| Browser support | Chrome, Edge (limited Firefox) | All browsers | All browsers |
| Account required | Yes (Microsoft account) | Yes for hosts | No |
| No-app join | Limited | Yes | Yes |
| Custom branding | Enterprise tier | Enterprise tier | Free |
| API access | Yes (Graph API) | Yes | Yes |
| SSO integration | Azure AD | SAML/OIDC ($) | Any OIDC provider |
| On-premise | Teams Rooms only | No | Full stack |
The tradeoff is clear: you trade money and vendor lock-in for the operational responsibility of running the infrastructure.
How Jitsi Works: The Four Core Components
Jitsi is not a single application — it's four services that work together. Understanding what each one does is the key to deploying and troubleshooting it confidently.
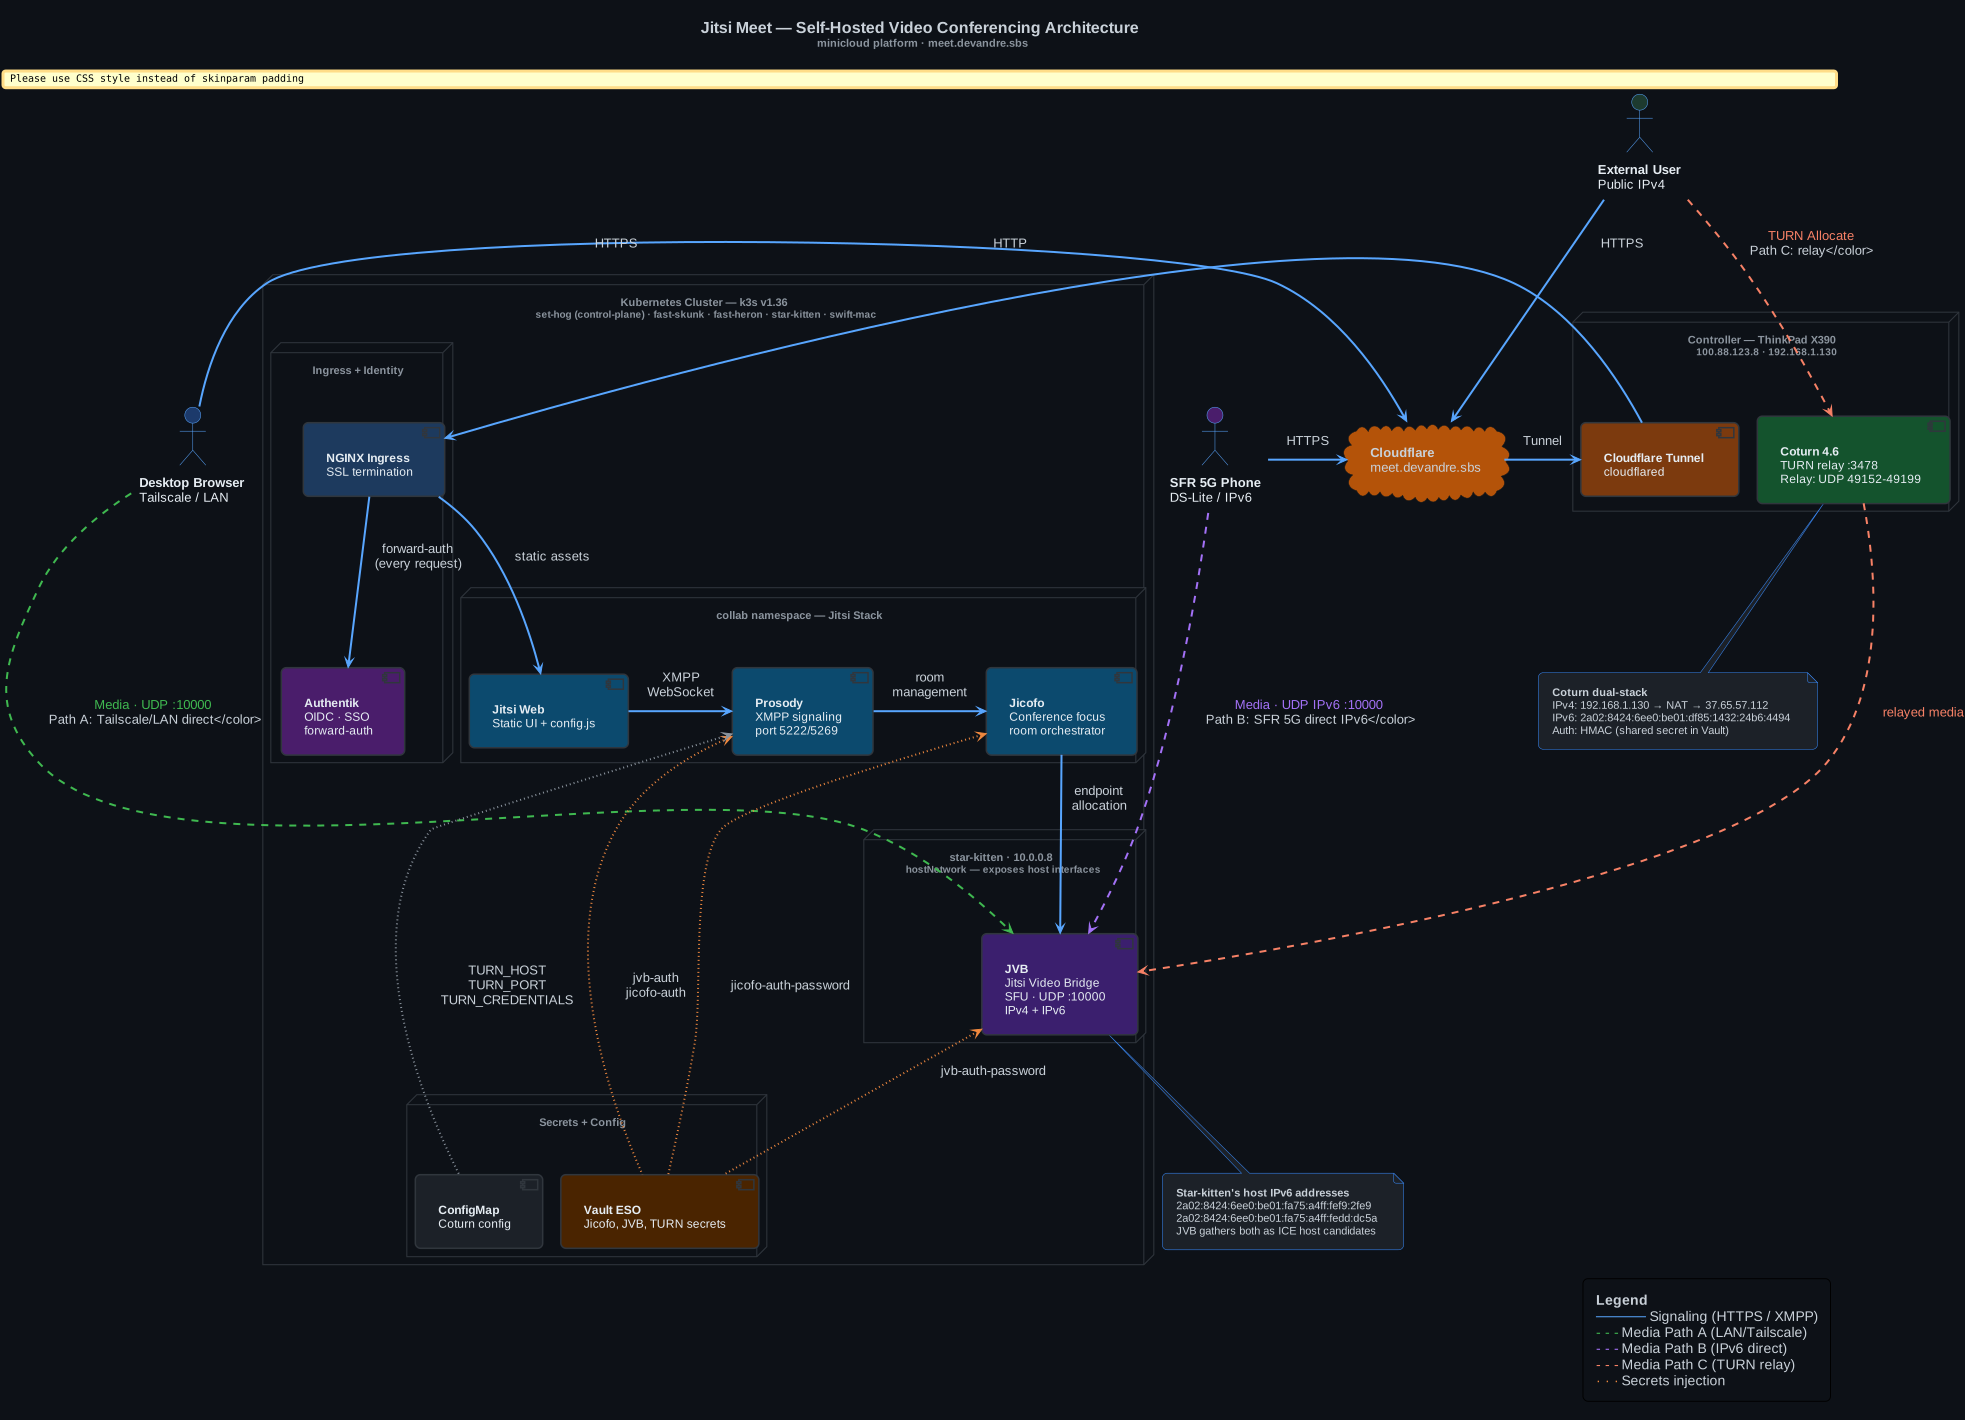
Full architecture: Jitsi stack, TURN relay, SSO, and the three media paths
1. Jitsi Web — The Frontend
This is the web application you see when you open meet.devandre.sbs. It's a React/JavaScript application that:
- Serves the meeting UI
- Loads the configuration (which XMPP server to connect to, which TURN servers to use)
- Uses the browser's WebRTC APIs to capture your camera and microphone
It's entirely static files. No backend logic — it just hands control over to the browser's WebRTC engine once loaded.
2. Prosody — The Signaling Server
Prosody is an XMPP server. XMPP is a chat protocol (the same one WhatsApp was originally built on), and Jitsi reuses it for signaling — the messages that coordinate the call setup before any video flows.
When you join a room, your browser connects to Prosody over a WebSocket and sends messages like:
- "I want to join room
myroom" - "Here are my ICE candidates (my network addresses)"
- "Here is my SDP offer (what audio/video codecs I support)"
Prosody forwards these messages to the other participants and to Jicofo.
3. Jicofo — The Conference Orchestrator
Jicofo stands for Jitsi Conference Focus. It's the brains of the operation:
- Creates the conference when the first person joins
- Tells JVB to allocate a new endpoint for each participant
- Sends each participant the SDP offer/answer with JVB's network addresses
- Manages participant lifecycle (join, leave, mute)
Think of Jicofo as the conference room manager: it reserves the room, hands out name tags (ICE candidates), and makes sure everyone knows where to sit.
4. JVB — The Video Bridge (The Critical One)
JVB stands for Jitsi Video Bridge. This is where all the actual video traffic flows through.
JVB is an SFU — Selective Forwarding Unit. Here's what that means in plain English:
In a normal video call between 3 people, each person would need to upload their video to the other 2. With 10 people, that's 9 upload streams each. It scales terribly.
An SFU sits in the middle. Each person uploads one stream to the SFU. The SFU then forwards the right streams to the right people. 3 people → 3 upload streams total, not 6.
Crucially, JVB does not decode your video. It forwards encrypted packets. The content of your video never leaves the encrypted stream, even though it passes through the JVB server.
How a Call Is Actually Established
The connection process sounds complicated, but it follows a clear sequence. Here's what happens between "clicking Join" and "seeing your colleague's face":
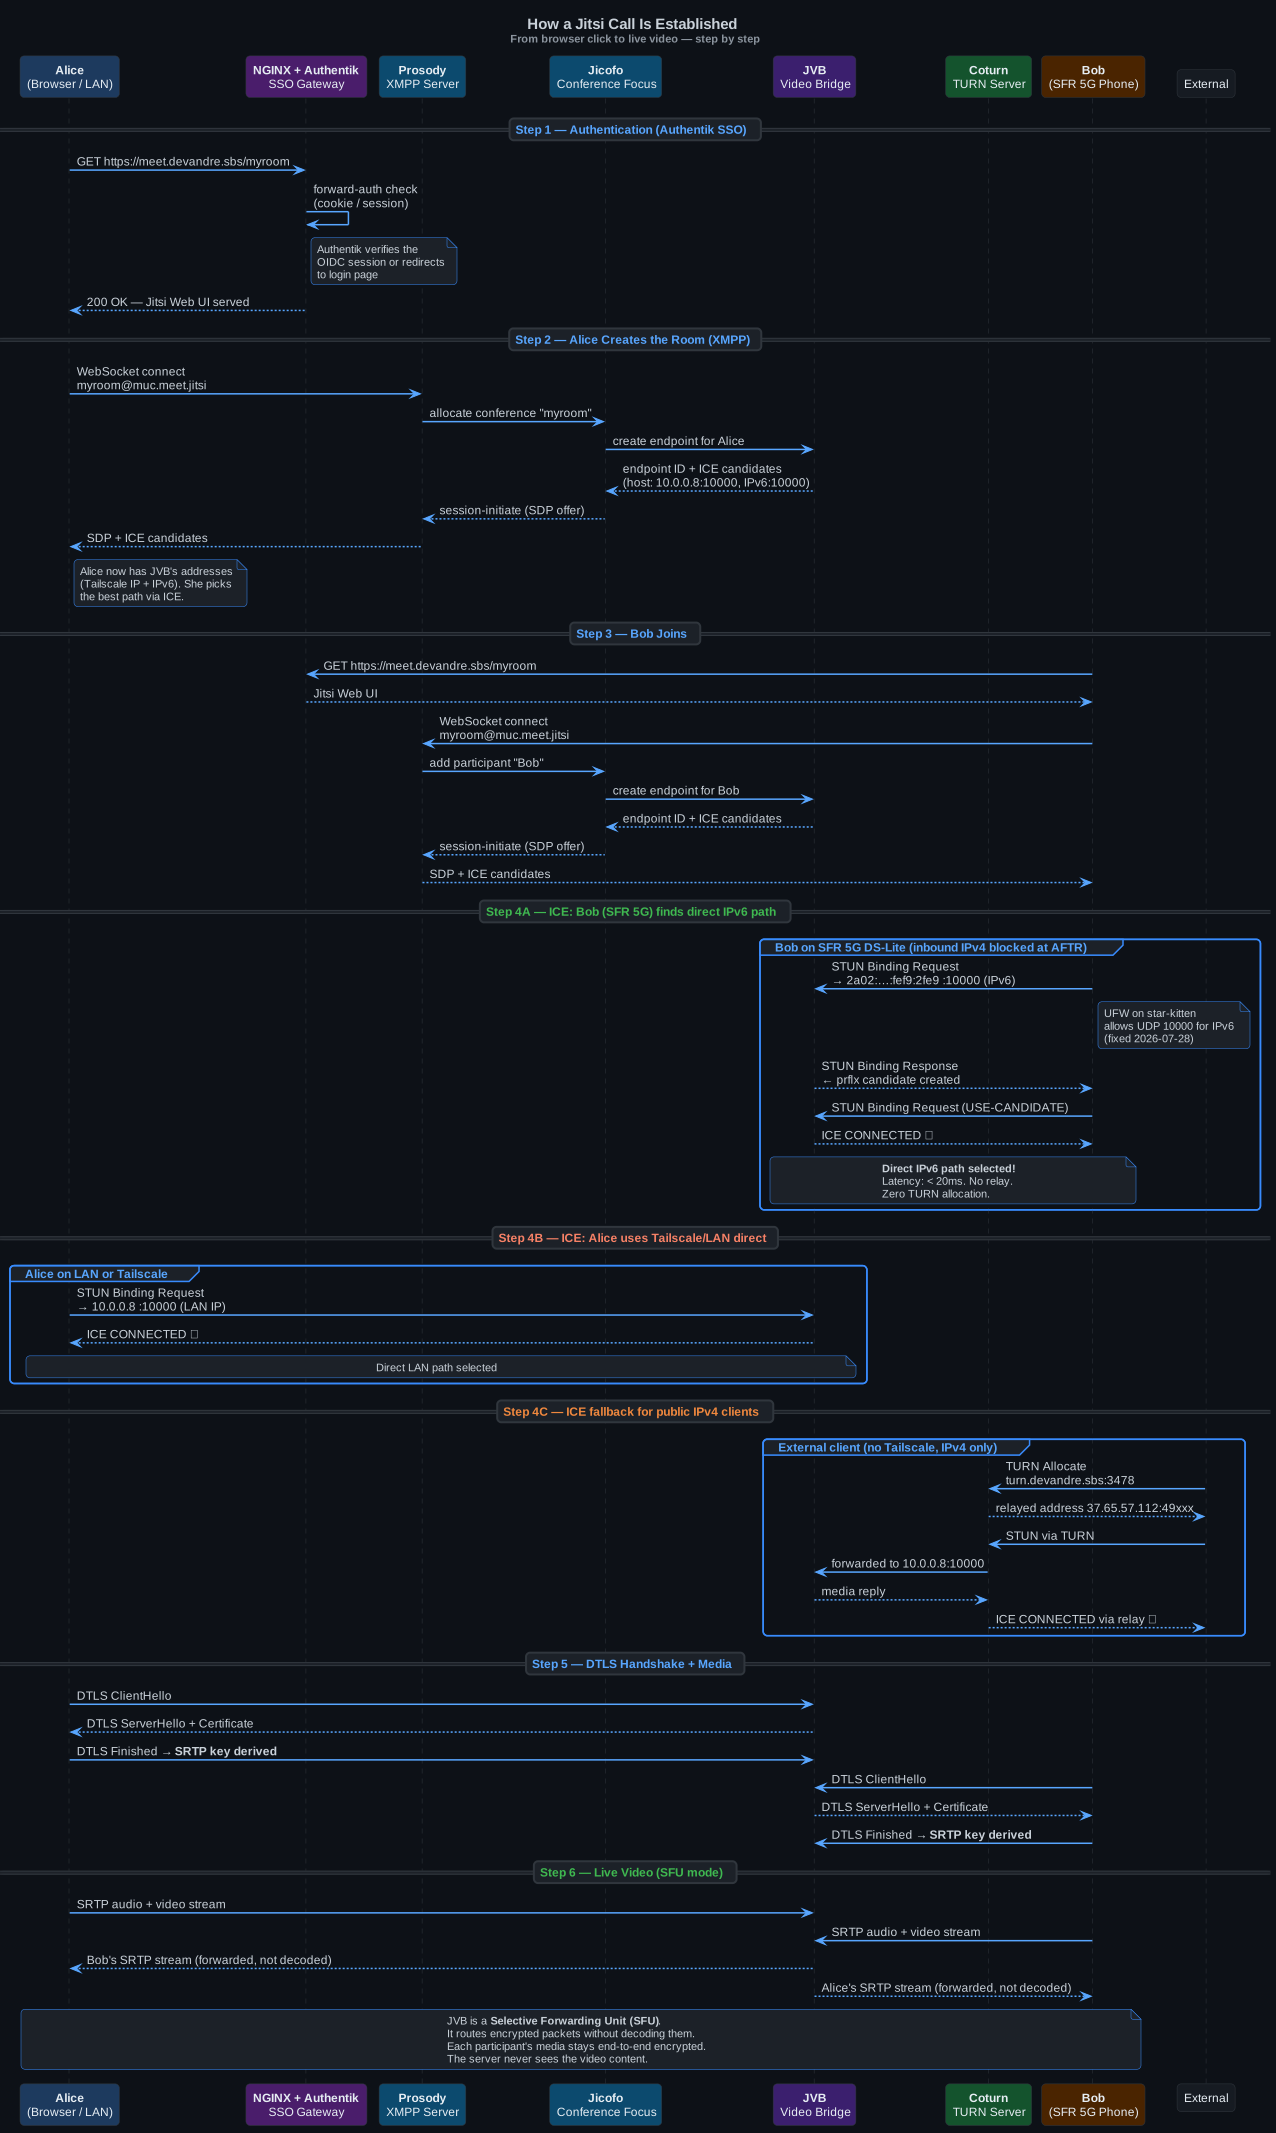
Step-by-step: from browser click to live SRTP video
Step 1: Authentication
Before seeing anything, your browser hits the NGINX ingress which forwards the request to Authentik. If you have a valid SSO session, you're let through immediately. If not, you're redirected to the Authentik login page (username + TOTP code). Once authenticated, the Jitsi Web UI loads.
This means no one can join a meeting without a company account. The room name is not a secret — the SSO layer is the gate.
Step 2: Signaling (XMPP)
Your browser connects to Prosody over a WebSocket and sends a "join room" request. Prosody passes this to Jicofo, which tells JVB to create a new endpoint for you. JVB replies with its network addresses — its ICE candidates.
Step 3: ICE — Finding the Best Network Path
This is the step most people don't know about. ICE (Interactive Connectivity Establishment) is the process where your browser and JVB negotiate the best way to reach each other.
ICE works by both sides listing all their network addresses (called candidates), then trying each one in priority order until they find one that works:
- Host candidates: direct IP addresses (LAN IPs, Tailscale IPs, IPv6 addresses)
- Server-reflexive candidates: your public IP as seen from a STUN server
- Relayed candidates: addresses on a TURN relay server
The browser tries them all in parallel. The first one that gets a successful STUN ping response is selected.
Step 4: DTLS + SRTP
Once ICE selects a path, the browser and JVB perform a DTLS handshake — essentially TLS over UDP. From this handshake, both sides derive encryption keys. From that point on, all audio and video is encrypted as SRTP (Secure Real-time Transport Protocol).
The video stream is encrypted end-to-end in the sense that it's always in an encrypted SRTP packet. JVB forwards these packets without ever having the decryption key.
The Deployment: Jitsi on Kubernetes
Why Kubernetes?
Running Jitsi as four Docker Compose services on a single VM works fine for a small team. The reasons to move to Kubernetes are:
- Automatic restarts if a component crashes
- Resource limits to prevent one service starving the others
- GitOps — every configuration change is a git commit, not a manual edit on a server
- Secrets management via Vault + External Secrets Operator (no passwords in git)
- Observability — Prometheus scraping, Grafana dashboards, Loki logs
The Jitsi stack in this setup runs in a dedicated collab namespace on k3s.
The Helm Chart and Values
The community-maintained jitsi-contrib Helm chart deploys all four components with a single helm install. The key configuration decisions:
# helm-values/jitsi-values.yaml (simplified)

publicURL: "https://meet.devandre.sbs"
tz: "Europe/Paris"

# No per-meeting JWT auth — Authentik handles access control
# at the HTTP level before anyone reaches Jitsi
enableAuth: false
enableGuests: true

jvb:
  # JVB must use the host's network interfaces directly
  # so it can bind to the real IP and IPv6 addresses
  useHostNetwork: true

  # Pin JVB to the node with the right network config
  nodeSelector:
    kubernetes.io/hostname: star-kitten

  # Advertise the LAN IP so Tailscale/LAN clients can reach it directly
  publicIPs:
    - "10.0.0.8"

  # The media port — must match the UFW rule and SFR box firewall
  UDPPort: 10000

prosody:
  # Inject TURN config via ConfigMap + ESO secret
  extraEnvFrom:
    - configMapRef:
        name: jitsi-coturn-config    # TURN_HOST, TURN_PORT
    - secretRef:
        name: jitsi-coturn-secret    # TURN_CREDENTIALS (HMAC)
The JVB hostNetwork: true Decision
This is the most important configuration choice. By default, a Kubernetes pod gets its own virtual network interface with a private pod IP (10.42.x.x). That's fine for web services, but fatal for a video bridge.
JVB needs to send UDP packets directly to your browser's IP. With a pod network, the packets would be source-NAT'd to the node's IP by kube-proxy — and JVB would think all clients are coming from the node itself, destroying ICE.
With hostNetwork: true, the JVB pod shares the host's network namespace. It binds to star-kitten's actual interfaces: 10.0.0.8 (LAN), 100.x.x.x (Tailscale), and all IPv6 addresses assigned by the SFR router. Every interface becomes an ICE candidate.
Secrets Management
No passwords are hardcoded. All secrets flow from Vault through the External Secrets Operator:
Vault secret/platform/jitsi
  ├── jvb-auth-user          → Kubernetes Secret jitsi-jvb-secret
  ├── jvb-auth-password      →   (used by prosody + jvb)
  ├── jicofo-auth-password   → Kubernetes Secret jitsi-jicofo-secret
  └── coturn-secret          → Kubernetes Secret jitsi-coturn-secret
                                 (HMAC key for TURN auth tokens)
The SSO Integration: Authentik
Every app on this platform is protected by Authentik, an open-source identity provider. For Jitsi, the setup uses forward-auth at the NGINX ingress layer.
Here's how it works:
- A request arrives at
meet.devandre.sbs - NGINX sends a sub-request to Authentik's
/outpost.goauthentik.io/auth/nginxendpoint - Authentik checks if the request has a valid session cookie
- If yes: NGINX forwards the request to Jitsi Web, also injecting the username as
X-authentik-username - If no: NGINX returns a 302 redirect to the Authentik login page
The entire authentication flow is handled before a single Jitsi component sees the request. Jitsi itself doesn't know or care about authentication — the NGINX ingress already filtered out unauthenticated users.
nginx.ingress.kubernetes.io/configuration-snippet: |
  auth_request     /outpost.goauthentik.io/auth/nginx;
  error_page       401 = @goauthentik_proxy_signin;
The benefit: any change to who can access Jitsi (new users, MFA policies, group restrictions) is made in Authentik, not in Jitsi's configuration. Jitsi doesn't need to know about your user directory.
The TURN Server: Reaching Clients Behind NAT
Most home and office networks use NAT (Network Address Translation). Your laptop has a private IP like 192.168.1.50, but the internet sees it as your router's public IP 37.65.x.x. This creates a problem for WebRTC: how does JVB send video packets to 192.168.1.50 when it only knows the public IP?
STUN helps for most cases by discovering the public IP and port. But some firewalls and carrier NATs are strict enough that STUN doesn't work. That's where TURN comes in.
A TURN server is a relay. Instead of connecting directly to JVB, the client connects to the TURN server and says "relay my packets to JVB". The TURN server forwards everything in both directions.
In this setup, Coturn runs on the controller (the ThinkPad X390 that also runs MAAS and NAT for the cluster), exposed via port-forward on the home router.
turn.devandre.sbs → 37.65.57.112 (public IP) → router NAT → 192.168.1.130 (controller)
Coturn uses time-limited HMAC tokens for authentication. Prosody generates a fresh token when you join a meeting. The token encodes your username and an expiry timestamp, signed with a shared secret. Even if someone intercepts the token, it stops working after 24 hours.
The SFR 5G Problem — and the IPv6 Solution
This is the most interesting part of the deployment, and the problem that took the longest to diagnose.
The Problem: DS-Lite Blocks Inbound IPv4
SFR (a French mobile carrier) uses a technology called DS-Lite on their 5G network. In DS-Lite, your phone gets a real public IPv6 address, but its IPv4 traffic is tunneled through a shared carrier-grade NAT (CGNAT) called an AFTR.
The consequence: inbound IPv4 connections to your phone are blocked at the carrier level. The AFTR sits between your phone and the internet, and it doesn't forward unsolicited inbound packets.
This breaks TURN. WebRTC browsers always request REQUESTED-ADDRESS-FAMILY=IPv4 when allocating a TURN relay address. The TURN server gives you a relay IPv4 address, but when JVB tries to send media to it, the packet never reaches the phone — it's blocked at the AFTR.
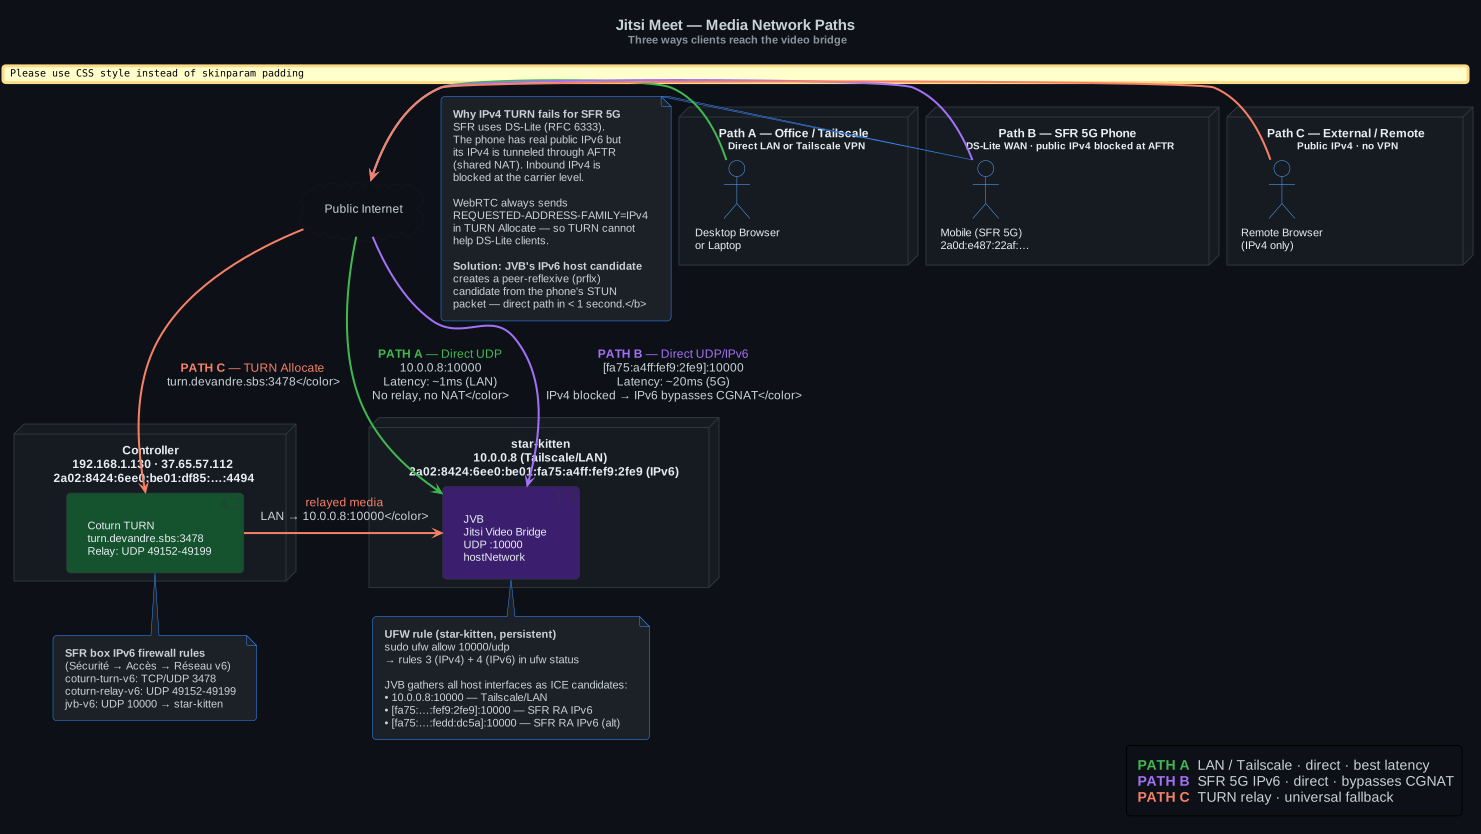
The three media paths: LAN/Tailscale, IPv6 direct (SFR 5G), and TURN relay fallback
The Diagnosis
The phone's ICE negotiation appeared to be working — the STUN packets from the phone were arriving at star-kitten's network interface. tcpdump captured them clearly. But JVB never responded.
# tcpdump on star-kitten — packets visible at NIC level:
# 21:17:32 2a0d:e487:22af:6804::1 > 2a02:8424:6ee0:be01:fa75:a4ff:fef9:2fe9: UDP 108
# 21:17:32 2a0d:e487:22af:6804::1 > 2a02:8424:6ee0:be01:fa75:a4ff:fef9:2fe9: UDP 108
# (zero outbound packets from JVB)
The firewall was the culprit. Ubuntu's UFW was configured with IPv4 rules only — ufw allow 10000/udp adds an iptables rule for IPv4, but the IPv6 equivalent (ip6tables) was an empty chain with policy DROP.
The packets arrived at the NIC. The firewall dropped them before they reached JVB's socket.
The Fix
# On star-kitten — this adds BOTH IPv4 and IPv6 rules:
sudo ufw allow 10000/udp
# Creates:
#   iptables  -A ufw-user-input -p udp --dport 10000 -j ACCEPT
#   ip6tables -A ufw6-user-input -p udp --dport 10000 -j ACCEPT
And on the SFR home router (GR140IG), three IPv6 firewall rules to allow inbound traffic to the cluster (Sécurité → Accès → Réseau v6):
| Rule name | Destination | Port | Protocol |
|---|---|---|---|
jvb-v6 | 2a02:8424:6ee0:be01:fa75:a4ff:fef9:2fe9 | 10000 | UDP |
coturn-turn-v6 | 2a02:8424:6ee0:be01:df85:1432:24b6:4494 | 3478 | TCP + UDP |
coturn-relay-v6 | same | 49152–49199 | UDP |
After the fix, the result was immediate:
ICE state: Completed
Selected pair: [fa75:a4ff:fef9:2fe9]:10000/udp/host → [2a0d:e487:…]:57806/udp/prflx
DTLS 1.2 complete
The phone connected in under one second with zero TURN relay, using a direct IPv6 path between the 5G network and star-kitten's IPv6 address — bypassing CGNAT entirely.
Setting It Up Yourself: A Practical Guide
Here's a condensed step-by-step for deploying Jitsi on your own Kubernetes cluster.
Prerequisites
- A Kubernetes cluster (k3s, EKS, GKE — doesn't matter)
- NGINX Ingress Controller
- cert-manager for TLS certificates
- A domain name with DNS control
- A node where JVB will run (needs a public or routable IP)
Step 1 — Add the Helm Repository
helm repo add jitsi-contrib https://jitsi-contrib.github.io/jitsi-helm/
helm repo update
Step 2 — Generate Random Passwords
# These go in Kubernetes Secrets or Vault
JICOFO_PASSWORD=$(openssl rand -hex 32)
JVB_PASSWORD=$(openssl rand -hex 32)
TURN_SECRET=$(openssl rand -hex 32)
Step 3 — Create the Namespace and Secrets
kubectl create namespace jitsi

kubectl create secret generic jitsi-jicofo-secret -n jitsi \
  --from-literal=JICOFO_AUTH_PASSWORD=$JICOFO_PASSWORD

kubectl create secret generic jitsi-jvb-secret -n jitsi \
  --from-literal=JVB_AUTH_PASSWORD=$JVB_PASSWORD

kubectl create secret generic jitsi-turn-secret -n jitsi \
  --from-literal=TURN_CREDENTIALS=$TURN_SECRET
Step 4 — Write Your Values File
# values.yaml
publicURL: "https://meet.yourdomain.com"
tz: "Europe/Paris"

enableAuth: false
enableGuests: true

web:
  ingress:
    enabled: true
    ingressClassName: nginx
    annotations:
      cert-manager.io/cluster-issuer: letsencrypt-prod
    hosts:
      - host: meet.yourdomain.com
        paths: [/]
    tls:
      - secretName: jitsi-tls
        hosts: [meet.yourdomain.com]

jvb:
  useHostNetwork: true          # Critical — do not skip this
  nodeSelector:
    kubernetes.io/hostname: YOUR_NODE_NAME
  publicIPs:
    - "YOUR_NODE_PUBLIC_IP"
  UDPPort: 10000
  xmpp:
    existingSecretName: jitsi-jvb-secret

jicofo:
  xmpp:
    existingSecretName: jitsi-jicofo-secret

coturn:
  enabled: false    # Run Coturn separately for more control
Step 5 — Open the Firewall
On the node where JVB will run:
# Allow WebRTC media traffic
sudo ufw allow 10000/udp

# Verify both IPv4 and IPv6 rules were added:
sudo ufw status numbered
# Should show rules 3 and 4 for port 10000/udp
Also open UDP 10000 on your router/cloud security group pointing to that node.
Step 6 — Install
helm install jitsi jitsi-contrib/jitsi-meet \
  -n jitsi \
  -f values.yaml
Check that all pods are running:
kubectl get pods -n jitsi
# NAME                          READY   STATUS    RESTARTS
# jitsi-web-xxx                 1/1     Running   0
# jitsi-prosody-xxx             1/1     Running   0
# jitsi-jicofo-xxx              1/1     Running   0
# jitsi-jvb-xxx                 1/1     Running   0
Step 7 — Test
Open https://meet.yourdomain.com/test in two different browsers (or browser + phone). If video flows in both directions, ICE completed successfully.
To check which ICE candidate was selected, open the browser developer console and run:
// In Chrome/Edge — shows the selected ICE pair
const pc = APP.conference._room.rtc._peerConnections.values().next().value.peerconnection;
const stats = await pc.getStats();
stats.forEach(s => { if(s.type === 'candidate-pair' && s.nominated) console.log(s); });
Coturn: Running Your Own TURN Server
For users who can't connect directly (strict corporate firewalls, certain mobile networks), a TURN server is the fallback.
Coturn is the most widely deployed open-source TURN server. Here's the minimum configuration:
# /etc/coturn/turnserver.conf

# The IP Coturn listens on (your server's LAN IP)
listening-ip=192.168.1.130
# Optional: add IPv6 if your server has a public IPv6
listening-ip=2001:db8::1

# Map private listening IP to public IP for external clients
external-ip=203.0.113.1/192.168.1.130
external-ip=2001:db8::1

listening-port=3478
min-port=49152
max-port=49199

realm=yourdomain.com

# HMAC authentication (time-limited tokens — more secure than user/password)
use-auth-secret
static-auth-secret=YOUR_RANDOM_SECRET_HERE

# Only allow relay to your JVB node (security!)
allowed-peer-ip=10.0.0.0-10.255.255.255

no-loopback-peers
no-multicast-peers
log-file=stdout
Run it as a Docker container:
docker run -d --name coturn \
  --net=host \
  --restart=always \
  -v /etc/coturn:/etc/coturn:ro \
  coturn/coturn:4.6 \
  -c /etc/coturn/turnserver.conf
Then add the TURN config to Prosody's environment:
TURN_HOST=turn.yourdomain.com
TURN_PORT=3478
TURN_TRANSPORT=udp
TURN_CREDENTIALS=YOUR_RANDOM_SECRET_HERE
Observability: Knowing When Something Is Wrong
A self-hosted video platform needs monitoring. Three signals matter most:
1. JVB conference count — are active calls happening?
jitsi_jvb_conferences
2. ICE failures — are clients failing to connect?
rate(jitsi_jvb_ice_failed_total[5m])
3. TURN allocation failures — is Coturn accepting connections?
# From Coturn logs
docker logs coturn 2>&1 | grep -i "error\|failed" | tail -20
Cost Comparison: Self-Hosted vs SaaS
For a team of 20 people:
| Solution | Monthly cost | Data location | Control |
|---|---|---|---|
| Microsoft Teams Essentials | €38 (€1.90/user) | Microsoft EU | Low |
| Microsoft 365 Business Basic | €120 (€6/user) | Microsoft EU | Low |
| Zoom Pro | €115/month (10 hosts) | Zoom datacenters | Low |
| Jitsi (self-hosted) | ~€5 electricity | Your rack | Full |
The €5/month is an estimate for the extra power draw of dedicating one machine to the task. If it runs on hardware you already own for other purposes (as in this setup), the marginal cost is essentially zero.
The real cost is engineering time to set up and maintain it — roughly 8–10 hours initial setup, then 1–2 hours per month for updates and monitoring review.
Lessons Learned
UFW's IPv6 rules are separate from IPv4 rules. sudo ufw allow 10000/udp adds both, but if you add the rule via iptables directly, you may only get IPv4. Always verify with sudo ufw status numbered and look for both the IPv4 and "Anywhere (v6)" entries.
TURN cannot bridge IPv4 and IPv6. This is a fundamental WebRTC constraint. If a client's public IPv4 is behind carrier NAT (DS-Lite, CGNAT), TURN IPv4 relay is useless. The only solution is a direct IPv6 path — which requires the server to have a public IPv6 and the firewall to allow inbound IPv6 UDP.
hostNetwork: true on JVB is non-negotiable. Without it, ICE will never work correctly. You'll see candidates, but the STUN ping-pong will fail because the source IP of JVB's packets won't match any candidate.
Authentik forward-auth is simpler than Jitsi's built-in JWT auth. Jitsi has its own JWT-based token system for room-level access control. It works, but it requires generating tokens for each meeting and distributing them. Authentik forward-auth at the ingress level is simpler and gives you all the access control you need for an internal team setup.
The Helm chart's coturn.enabled=false path is underserved. When you run Coturn externally, the chart doesn't inject the TURN config into Prosody. You need to do it manually via extraEnvFrom with a ConfigMap and Secret. This is documented in the chart but easy to miss.
Disable WebSocket transport when running behind Cloudflare. The jitsi-contrib chart has two WebSocket options: websockets.colibri.enabled (JVB signaling) and websockets.xmpp.enabled (Prosody). Both must be false when you proxy the domain through Cloudflare. Cloudflare's proxy layer interferes with the WebSocket upgrade on those paths, causing silent connection failures that are hard to distinguish from ICE problems. With them disabled, JVB uses SCTP over DTLS for signaling, which flows cleanly through the media channel.
websockets:
  colibri:
    enabled: false
  xmpp:
    enabled: false
Authentik forward_single vs forward_domain — one provider per application. The forward_domain provider (which covers *.devandre.sbs) can only be assigned to a single Authentik application at a time. If you try to reuse it for Jitsi after it's already assigned to another app, you'll get "Application with this provider already exists." The solution: create a dedicated forward_single provider for Jitsi (external_host: https://meet.devandre.sbs), create a new application pointing to it, then PATCH the Embedded Outpost to add the new provider to its providers list. One provider, one application — always.
What's Next
This deployment covers a team that's all connected to the same Tailscale network or behind the same carrier. For a deployment that needs to support large public meetings (100+ participants), the next step would be:
- Multiple JVB instances with Octo Cascade (JVB-to-JVB federation)
- Jibri for meeting recording and live streaming
- Jigasi for PSTN dial-in via SIP
For the current use case — a 5-node bare-metal cluster serving a team of under 50 — a single JVB instance handles everything comfortably. JVB's forwarding is efficient: in a 10-person call, each participant uploads one stream, and JVB fans it out to the other 9. CPU usage on a single JVB stays under 30% for calls of that size.
The full configuration lives in the minicloud-gitops repository under helm-values/jitsi-values.yaml and manifests/jitsi/.